整合HTML5多媒体API中各种属性、方法和事件,本例演示如何在一个视频中实现对这些信息进行访问和操控,示例效果如图20所示。
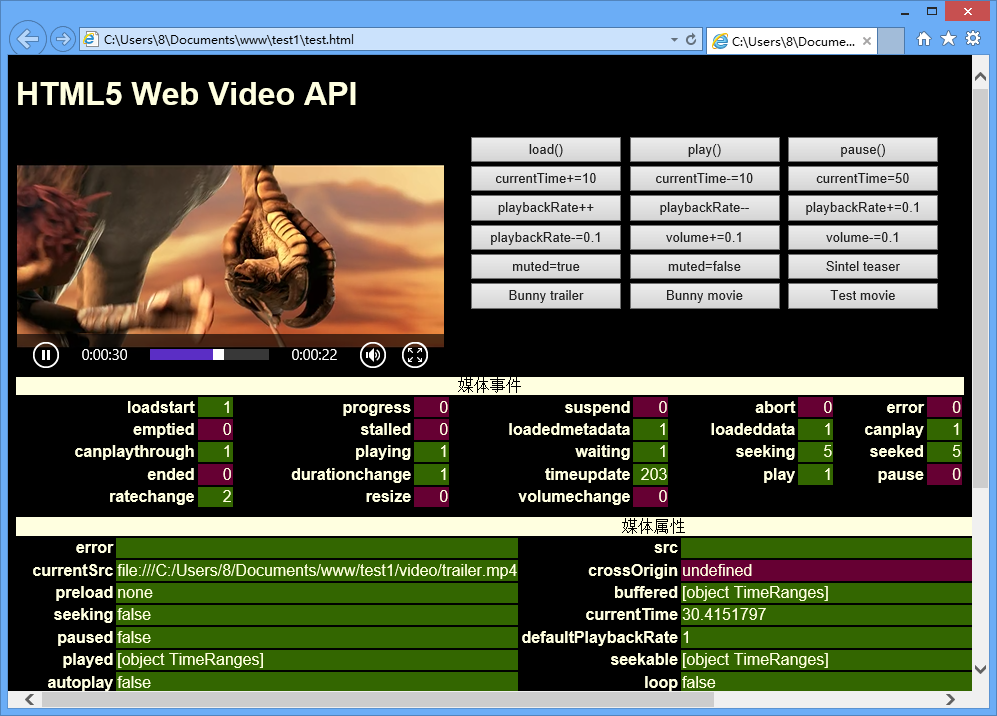
图20 HTML5多媒体API接口访问
【操作步骤】
第1步,设计文档结构。整个结构包含3部分:<video id='video'>视频播放界面、<div id='buttons'>视频控制方法集、<div id="info">接口访问信息汇总。
<h1>HTML5 Web Video API</h1>
<div>
    <video id='video' controls preload='none'  poster="video/trailer.png">
        <source id='mp4' src="video/trailer.mp4"  type='video/mp4'>
        <source id='webm'  src="video/trailer.webm" type='video/webm'>
        <source id='ogv'  src="video/trailer.ogv" type='video/ogg'>
        <p>你的浏览器不支持HTML5 video元素。</p>
    </video>
    <div id='buttons'>
        <button  onclick="getVideo().load()">load()</button>
        <button  onclick="getVideo().play()">play()</button>
        <button  onclick="getVideo().pause()">pause()</button>
        <button  onclick="getVideo().currentTime+=10">currentTime+=10</button>
        <button  onclick="getVideo().currentTime-=10">currentTime-=10</button>
        <button  onclick="getVideo().currentTime=50">currentTime=50</button>
        <button  onclick="getVideo().playbackRate++">playbackRate++</button>
        <button onclick="getVideo().playbackRate--">playbackRate--</button>
        <button  onclick="getVideo().playbackRate+=0.1">playbackRate+=0.1</button>
        <button  onclick="getVideo().playbackRate-=0.1">playbackRate-=0.1</button>
        <button  onclick="getVideo().volume+=0.1">volume+=0.1</button>
        <button  onclick="getVideo().volume-=0.1">volume-=0.1</button>
        <button  onclick="getVideo().muted=true">muted=true</button>
        <button  onclick="getVideo().muted=false">muted=false</button>
        <button onclick="switchVideo(0);">Sintel  teaser</button>
        <button  onclick="switchVideo(1);">Bunny trailer</button>
        <button  onclick="switchVideo(2);">Bunny movie</button>
        <button  onclick="switchVideo(3);">Test movie</button>
    </div>
    <div id="info">
        <table>
             <caption>媒体事件</caption>
             <tbody id='events'> </tbody>
        </table>
        <table>
             <caption>媒体属性</caption>
             <tbody  id='properties'></tbody>
        </table>
        <table  id='canPlayType'>
             <caption>播放类型</caption>
             <tbody id='m_video'></tbody>
        </table>
        <table id='tracks'>
             <caption>轨道</caption>
             <tbody>
                 <tr><th>Audio</th><th>Video</th><th>Text</th></tr>
                 <tr><td id='m_audiotracks' class='false'>?</td><td  id='m_videotracks' class='false'>?</td> <td id='m_texttracks'  class='false'>?</td></tr>
             </tbody>
        </table>
    </div>
</div>
第2步,初始化多媒体事件和属性数据。
//初始化事件类型
var media_events = new Array();
media_events["loadstart"] = 0;
media_events["progress"] = 0;
media_events["suspend"] = 0;
media_events["abort"] = 0;
media_events["error"] = 0;
media_events["emptied"] = 0;
media_events["stalled"] = 0;
media_events["loadedmetadata"] = 0;
media_events["loadeddata"] = 0;
media_events["canplay"] = 0;
media_events["canplaythrough"] = 0;
media_events["playing"] = 0;
media_events["waiting"] = 0;
media_events["seeking"] = 0;
media_events["seeked"] = 0;
media_events["ended"] = 0;
media_events["durationchange"] = 0;
media_events["timeupdate"] = 0;
media_events["play"] = 0;
media_events["pause"] = 0;
media_events["ratechange"] = 0;
media_events["resize"] = 0;
media_events["volumechange"] = 0;
//在数组中汇集多媒体属性
var media_properties = [ "error", "src",  "srcObject", "currentSrc", "crossOrigin",  "networkState", "preload", "buffered",  "readyState", "seeking", "currentTime",  "duration","paused", "defaultPlaybackRate",  "playbackRate", "played", "seekable",  "ended", "autoplay", "loop",  "controls", "volume","muted",  "defaultMuted", "audioTracks", "videoTracks",  "textTracks", "width", "height",  "videoWidth", "videoHeight", "poster" ];
第3步,初始化事件函数,在该函数中根据初始化的多媒体事件数组media_events,逐一读取每一个元素所存储的事件类型,然后为播放的视频对象绑定事件。同时使用for语句把每个事件的当前状态值汇集并显示在页面表格中,如上图所示。
function init_events(id, arrayEventDef) {
    var f;
    for (key in arrayEventDef) {
         document._video.addEventListener(key, capture, false);
    }
    var tbody = document.getElementById(id);
    var i = 1;
    var tr = null;
    for (key in arrayEventDef) {
        if (tr == null)  tr    = document.createElement("tr");
        var th =  document.createElement("th");
        th.textContent = key;
        var td =  document.createElement("td");
         td.setAttribute("id", "e_" + key);
        td.textContent =  "0";
        td.className =  "false";
        tr.appendChild(th);
        tr.appendChild(td);

        if ((i++ % 5) == 0) {
             tbody.appendChild(tr);
             tr = null;
        }
    }
    if (tr != null) tbody.appendChild(tr);
}
第3步,初始化属性函数,在该函数中根据初始化的多媒体属性数组media_properties,逐一读取每一个元素所存储的属性,然后使用do语句把每一个属性值显示在页面表格中,如上图所示。
function init_properties(id, arrayPropDef, arrayProp) {
    var tbody = document.getElementById(id);
    var i = 0;
    var tr = null;
    do {
        if (tr == null)  tr    = document.createElement("tr");
        var th =  document.createElement("th");
        th.textContent =  arrayPropDef[i];
        var td =  document.createElement("td");
        var r;
         td.setAttribute("id", "p_" + arrayPropDef[i]);
        r =  eval("document._video." + arrayPropDef[i]);
        td.textContent = r;
        if (typeof(r) !=  "undefined") {
             td.className = "true";
        } else {
             td.className = "false";
        }
        tr.appendChild(th);
        tr.appendChild(td);
        arrayProp[i] = td;
        if ((++i % 3) == 0) {
             tbody.appendChild(tr);
             tr = null;
        }
    } while (i < arrayPropDef.length);
    if (tr != null) tbody.appendChild(tr);
}
第4步,定义页面初始化函数,在该函数init()中,获取页面中的视频播放控件,然后调用init_events()和init_properties()函数,同时使用定时器,定义每隔250毫秒,将调用一次update_properties(),该函数将不断刷新多媒体属性值,并动态显示出来。
function init() {
    document._video =  document.getElementById("video");
    webm = document.getElementById("webm");
    media_properties_elts = new  Array(media_properties.length);
    init_events("events", media_events);
    init_properties("properties",  media_properties, media_properties_elts);
    init_mediatypes();
    setInterval(update_properties, 250);
}